Monday, August 27, 2012

Our Back to School Lunch

After what was possibly the most odd/frustrating/unnerving summers ever, we started back to school today.

One of my favorite parts of homeschooling is being able to declare any day I wish a class-party day. And the first day of school always seems to be worthy of a tiny celebration, even if we've only taken two weeks off!

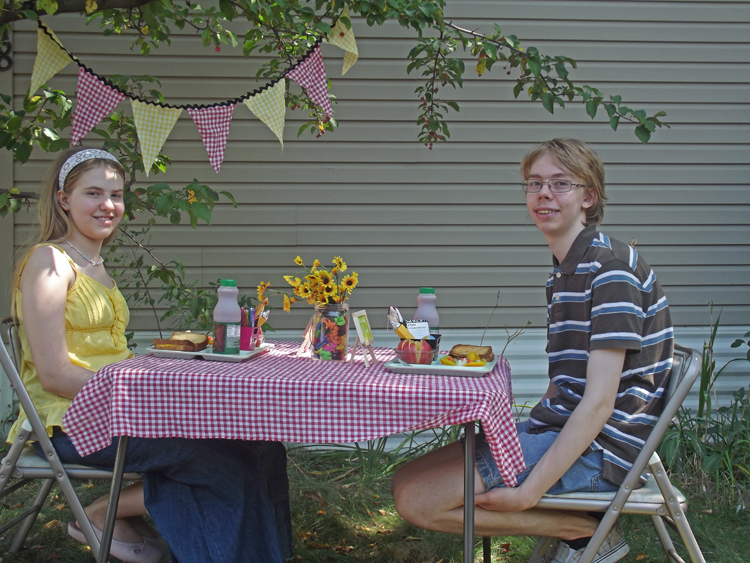
In our front yard is a beautiful flowering crabapple tree. The kids named it "The Treat Tree" while in kindergarten because while inedible to us, the bird & squirrels seem to think that the tiny crabapples are a wonderful treat. But once a year on the first day of school, I turn the tree into the backdrop for a special treat for my kids.

From its branches I hung a tiny banner made from gingham & ricrack. Then underneath the tree, I set out our little card table with a matching gingham tablecloth. For a centerpiece, I took alphabet fridge magnets & tucked them into a mason jar full of sunflowers.

Lunch this year was grilled cheese sandwiches, mixed veggies, caramel-covered apple slices, (I use fat-free ice cream topping... it pours so well, is great for double-dipping, AND lower in fat & calories!!!) and an extra special bottle of chocolate milk. I surprised the kids this year with thrifted vintage school lunch-trays. They LOVED them and were absolutely ecstatic to learn that they were dishwasher safe so we can use them every day!


For a tiny surprise, each of the kids received a tiny metal pail with some colorful pens, an itty-bitty pocket notebook, a cute globe-shaped pencil sharpener and a few candies put together to resemble giant pencils. I got the idea for the pencils HERE and they were so easy to put together!

Usually we eat lunch inside without any kind of ceremony but the kids really seem to like our first-day picnic. For the past month I've been being asked "We ARE gonna have a special lunch this year, RIGHT?!?" I had considered skipping it this year since both kids are in high-school and I didn't want to embarrass them, but after being asked several times by BOTH kids - well, I just couldn't NOT plan something special.

This is one tradition I'm glad we've kept up.

Friday, May 25, 2012

Happy Memorial Day!

During the summer, I keep the same decorations up from Memorial Day until my fall decorations go up. Because of Memorial Day and the Fourth of July, nearly everything has a patriotic theme.
Because I save decorations from one year to the next, much of this may look familiar to people. The wreath on my front door and the garland on my dining room chandelier are identical... and most of my other decorations are the same, I've just switched around what is displayed together. (If anyone wants to see last years decorations, they are HERE!)


This year I decided to add even more crepe-paper to my decorating. I love the way it looks draped from my fireplace and kitchen cabinet-niche.


In my living room is our beach vignette full of soft, Florida sand and seashells from our visits to my sister and my wooden bowl of vintage spools.


The faux pearls and glass marbles I used from our Titanic display looked so pretty that I poured them into my giant seashell to extend their "stay" within the house, and I chose to pull out all but the red and white spools this time, and sprinkled my blue buttons throughout the thread bowl. (the doily was made by my grandmother years ago)


Atop the china cupboard are my flags, and the tiny blackboard I made last winter
 
And on my little hutch, I decided to do something completely new. I reprinted photos of several of our family relatives who have served our country and created a true "Memorial" display along with their rank, the branch of military they served in, and which war they are associated with.
 
I LOVE how the hutch turned out and that it's so personal! There are my children's Great-Grandmother & Great-Great Grandmother, their great-uncle, both my parents, and several second-cousin type relations represented, and the photos are from WWI through an active serviceman.


We have an awful lot to be thankful for in this country, but the one thing I can't even begin to imagine living without are the many MANY freedoms that we take for granted on a daily basis.

I want my children to grow up knowing that our freedom came with a price - and to know some of the stories of those who have helped to pay that price... whether it's their distant-cousin who was killed in action over China during WWII, their great uncle who seems to have been EVERYWHERE during WWII or their grandparents who met, fell in love, and were married during the Vietnam War.

These are just a few of our heroes, and we are MOST grateful for the sacrifices they gave to this country.

Happy Memorial Day!


Saturday, May 19, 2012

My new Laundry / Pantry Hallway

I can't believe I never shared this! Here I sit ready to share my nearly-completed closet renovation, and I never shared what we did in the laundry hall!

Last fall we took on a "small" project that I've been begging to do for years. We completely redid our laundry hallway! Here's what things looked like to start with. As you can see, there are brackets over the chest-freezer (far right hand corner) where I USED to have shelves, but they fell down years ago & things have been piled helter-skelter ever since.

The teeny tiny cupboards above the washer & dryer weren't really big enough to use for storage, but WERE in the way of any truly useful storage options. 

Our "pantry" was three mismatched bookshelves, and I couldn't open the washing machine lid OR the freezer lid without rearranging boxes & baskets of miscellaneous "stuff."

Also, because the dryer vented straight down instead of out (which we discovered was a fire-hazard that never should have been installed that way in the first place) I couldn't open the dryer door all the way because it banged into the opposite wall!

These next two photos show the hallway stripped out, and ready to paint.

You can also see the doorway halfway down the hall. it went to the master bath, but in 12 years we  we had used this door just a few times, and I had HUGE plans for the space.

Originally I had planned on painting this space bright yellow to match my kitchen. However I forgot I'd already used up my yellow paint with a project at church, so instead I decided to use up the two gallons of red paint we had purchased for the living room before changing our mind.

It took me FOUR coats of paint to cover this thoroughly, despite the tiny area we were painting! Note to the wise... definitely use primer when using red paint.

Next you can see my plans for that doorway... shelves for my canning! Each shelf was measured to ideally hold quarts, pints & half-pints with JUST enough room to squeeze the next-largest size onto them just in case we canned in any one size than I planned. (This turned out to be perfect over the winter, after we picked up 1.5 bushels of tomatoes!)

You can also see the Coca-Cola baker's rack I found on Craigslist for $25. I love that it matched the color scheme perfectly AND added just a bit of visual interest!

And here are my finished canning shelves -complete with fabric shelf-liners trimmed in rick rack.

To the right, we finally got the dryer re-routed properly and pushed back into place.

Above, are my new shelves which run wall-to-wall. We mounted them on white beadboard so the room wouldn't appear TOO dark. The bins were purchased at Ikea, and the chalkboard labels were a fun "splurge" from Etsy.

And on top of the dryer, you can see my new ironing board! It's a sheet of plywood cut to the dimensions of the top of my dryer, covered in batting & cotton fabric. I LOVE how it looks, and it's ever so much more convenient than my clunky old metal ironing board to move about!

Including the cost of re-routing the dryer, this entire renovation cost us just under $150... but is worth SO much more to me! Laundry is no longer a juggling-act, and getting to the freezer is MUCH easier. And when I walk back to grab a jar of homemade applesauce, I just grin at my beautiful canning-shelves.

I've redone several rooms in the past few years, but this is by far my favorite renovation to date!

Saturday, April 14, 2012

History Day: Titanic's 3rd Class

One of the things I have tried to do with the kids, is find creative ways to learn about historical events. And yes, the 100th anniversary of the sinking of the Titanic seemed like a perfect time for something a little different. I suppose we COULD have watched Leonardo DiCaprio sink into the sea, but that seemed a little too predictable. So instead we decided to turn our learning into a "dinner experience."

In looking about online, I managed to find all sorts of interesting facts & photos to make tonight's dinner as authentic as possible. One of the more shocking facts is that the most expensive 1st class tickets aboard the Titanic cost $4350... in 1912! The average third class ticket on the other hand, cost $30. With numbers like that, (and after staring aghast at the 10-course meal that was served in first class) I decided it would make the most sense to dine as if we were third class passengers.


When Mrs. Sarah Roth, a third class passenger aboard the Titanic was rescued, she discovered she had managed to save a copy of the third class menu within her handbag. It was sold seven years ago for $44,650, but lucky for us images of this were EVERYWHERE on the internet, so a printed copy became part of our centerpiece alongside a vase of roses. On the menu for dinnertime (tea) on April 14th 1912 was:
* Cold Meat
* Cheese
* Pickles
* Fresh Bread & Butter
* Stewed Figs & Rice
* and of course Tea.

We substituted rice pudding for the stewed figs & rice because I had NO idea where to shop for fresh figs in April. Other than that, the menu was followed exactly.

Because the kids are constantly telling me that, while I require essays from them I never write them myself, I wrote a two-page micro essay describing what life aboard the Titanic would have been like, complete with photos of several of the rooms and a printed copy of a third class ticket.

There were printed images of first-class (I know, I know... but they were prettier!) boarding tickets at each place, and to our dinner & servingware I glued printouts of the White Star logo - to simulate the stoneware actually used in 3rd class and by the crew aboard the Titanic. I also found a list of songs played by the White Star Line (for 1st & 2nd class... but it was still music popular at the right time!) that played softly in the background while we ate.

The kids are about to start watching the documentary Titanica, before we all play Just Dance together... as third class passengers would have finished their night singing & dancing in the general room. It's been an interesting evening so far, and the kids really seemed to love discussing the differences between 1st & 3rd class life.

We will NOT however be going on any boats tonight!

Saturday, April 7, 2012

Happy Easter!!!

Oh boy, have our lives gotten busy over the past month! I JUST managed to take a few photos of our Easter decorations this afternoon!

In our house, we try to keep Easter low-key. Not because it isn't important - but because I prefer to have room for fresh dandelions & mason jars of crabapple or forsythia branches rather than heaps of random items. So the house takes on a very "fresh" look as it's scoured of nearly every glittery goodie from the winter months and bowls of pretty rocks & feathers take their place.

But on to our decorations! We leave the front door the same, for St. Patrick's Day AND Easter. Likewise, the hurricane vases of split peas & tealights are still displayed - they've just moved to a different table in the living room.

On the little accent table in our living room, we have a cutting from our crabapple tree with feather birds wired onto the branches and a tiny grapevine nest of teeny tiny eggs. Small pebbles & pretty bits of bark keep coming & going from this table as we find them, but at the moment we've swept it clear for Easter morning.

In the kitchen niche, I have my glittered chicks that were inspired by vintage greeting cards and a bouquet of silk flowers. (I did say NEARLY every glittery goodie!)

Our dining room is where most of our Easter decorations tend to find themselves. The chandelier is draped with a pretty floral garland, and the hutch is filled with all of the little critters we've made or picked up over the years... as well as the tiny plastic canvas houses my grandmother made years ago.


On my china cupboard sits the little blackboard that I FINALLY finished, and a teeny tiny Easter garden that I grew to share with my Children's Church class. The kids really seemed to enjoy peeking in, and double-checking that yes, the "tomb" was indeed empty.

And on the sewing table, are a few more reminders of what Easter is REALLY all about! (The lamb is in honor of Jesus; The Lamb of God... my daughter's idea!)


All I did to finish preparing our home for Easter, was add a few mason jars of fresh flowers on my favorite vintage tablecloth. We'll have a full house tomorrow with friends & family as we celebrate the most important day of the year.

Friday, March 16, 2012

Happy St. Patrick's Day!

I can't believe I'm not getting around to actually posting photos of my St. Patrick's Day decorations until the day before. These have been up since March 1st... and while it's one of my smallest holidays decoration-style, it's also one of my favorites.

In our house, we have Celtic roots from Ireland, Scotland, Wales, Cornwall... pretty much anywhere the ancient Celts lived, so did our ancestors. While we may not be Catholic - we ARE Irish and love celebrating our heritage during the month of March with traditional recipes, and fun leprechaun-free decorations.

On the front door, we hung this sweet little tin of shamrocks that may look familiar from THIS post from last year.


For the fireplace, we put up the same paper banner from last year. It's hard to read, so I may have to make a new one next year... but the letters spell out "Irish Blessings." Little Lambie sits on the hearth, in honor of all the sheep in Ireland.


On our little accent table in the living room, I borrowed an idea from Pinterest and filled a few of my hurricane vases with split-peas and tealights. The little angel is one of my favorite decorations, because her gown is printed with my favorite Irish Blessing:

May the road rise to meet you.
May the wind be always at your back.
May the sun shine warm upon your face.
And rains fall softly on your fields.
And until we meet again,
may God hold you in the palm of His hand.


Over on the sewing table, I did actually pick up a few new pieces this year. The tablerunner is actually an aran-knit scarf, and I found the sweetest little spun-cotton mushrooms to sit in my favorite milkglass bowl atop a few faux-moss rocks from the dollar-store.


On our little hutch nearly everything is identical from last year. The one addition I made, is a little paper doll with her sweet little piggie friend.


And the last little bit of Irish decoration is also a repeat from last year. Up in my kitchen niche are two reprinted vintage cards, and a vintage vase of sequined floral picks.


Truly, while I may love decorating the whole house for fall, I also enjoy how just a few small decorations can make such a huge impact on the look of my house!

Saturday, March 3, 2012

Whipped Cocoa Butter Recipe

I have been using the avocado-green Sunbeam mixer given to my mom when she was first married in 1968 for the past several years. It STILL works, but my son has asked several times if he could have it when he moves out and we've been looking for a replacement BEFORE the Sunbeam breathes it's last... and to be honest I've wanted something slightly more robust with a nice big dough-hook for awhile anyway. Meet Vincent. I named him Vincent because this mixer is one HUGE beast. And with a 300 watt motor, he's powerful too. I think it could beat our car to a smooth frothy consistency. Naturally with a new toy to play with, I feel the need to put it through a few... err... abusive paces to see what it's made of. Last night we whipped up some garlic-cheddar biscuits, and soon I'll be making oatmeal bread with the dough hooks. For this afternoon however, I thought I'd see how it handles running continuously. For an entire hour. On high. Because of course, you just never know when that'll come in handy with a mixer. I had an amazingly simple recipe for homemade whipped cocoa butter, but in searching around a bit I found some nice alternates to a few ingredients that I've been dying to try. And since we've just about finished up the last of my most recent batch, this seemed the perfect time to replenish our stock. To make this, you will need just four ingredients. These can be found at most health food stores, but if you can plan ahead... you can find them all online for MUCH cheaper! To make about four 4oz jars (I doubled the recipe because I plan on sharing) you will need: * 4oz cocoa butter (I prefer the wafers because they melt quicker) * 2oz apricot oil * 1tsp cornstarch * and 1/2tsp liquid Vitamin E If your cocoa butter is unscented you could also add up to a dozen drops of essential oils, (mandarin & lime would be divine!) but I prefer the chocolatey cocoa butter fragrance myself. To make this, melt down your cocoa butter, then refrigerate for 15 minutes to start it cooling. Whip it on medium in your blender for 15 minutes, then put it BACK into the refrigerator for another 10 minutes. Then whip it on high once more, for anywhere between 15 minutes to an hour. It's at this point that the mixture will go from being a gold liquid to a frothy white "whipped cream" consistency. That's what you want. I did mix mine for a full hour, but it didn't seem to expand after the first 30 minutes so that might have been plenty. Your mileage may vary, of course but that's what I noticed. Once it's done, simply spoon it into whatever cute jars you have laying around and use as you would a massage oil, or lotion. It will harden just a bit in the jar, but will melt on-contact with your skin so all you need to do is scoop out a teeny tiny bit and it'll melt down almost immediately. My kids prefer using this as hand cream just before bed! It smells divine, and after about 5 minutes any "greasy" sensation has soaked into the skin so ALL you're left with is wonderfully soft (chocolatey) skin!