Tuesday, January 29, 2013

Decoration Renovation

 My mother gave me a Valentine's decoration not that long ago, saying that she didn't intend to use it - and that maybe I could remake it into something I would like.

The more I stared at this, the more convinced I was that I wouldn't be able to use it, because I'm pretty sure I saw this for sale in a Current catalog... in 1984. The flashbacks were enough to give me nightmares of big hair & tiered miniskirts, so I set it aside for a few months.

With February arriving I pulled this out again, and decided I would either find a way to use it or donate it by the end of the week. Then it hit me... those are REALLY nice solid wood hearts - and while I don't like pastels, I DO like solid wood! So I decided to "tear them apart" and see what I could make.

The first step was to get rid of the gingham bow, and the raffia. After that, I thought I would sand them down. My daughter suggested sanding & then staining them, for a pretty rustic heart display. While this worked great for two of the hearts, after 45 minutes of intense sanding with the power-sander when there was STILL purple paint in the graining of the bottom heart I realized that just wasn't going to happen.

So I checked my paint drawer, and found a leftover can from a few years ago and sprayed them a bright glossy red.

Next, with my daughter's help, we added some antique white to the centers & around the edges, just to add a little visual interest.

Then it was time to decorate them, and after going through my entire sticker drawer I headed to Michaels where I found a sweet set of Valentine's Day stickers on sale for $3.

I very rarely use pink in my February decorations. I tell my preschoolers I'm afraid of pink, and that's not far from the truth. Growing up in a house full of girls - and now having a VERY girly teen of my own I think I've been overloaded. But I fell in love with the sweet critters on these stickers and decided to make an exception to the no-pink rule... AFTER I got my husband's approval, since I didn't want him cringing every time he saw these! 

After that, it was just a matter of finding a way of hanging them. I tried several options before I settled on making a short crocheted chain for them to hang from.

I really like how this turned out! It fills the inner space of my giant grapevine wreath, and is a definite improvement over the candy hearts! Even my son likes the cute critter stickers, so this is definitely going to be a favorite decoration for this year.

Besides, if I ever get bored with how it looks, I can always change it again!

Friday, January 11, 2013

A Little Clean Fun

The other day, we had a minor kitchen mishap. SOMEONE in our house, who would like to remain nameless, (while *I* would like to mention that just this once... it WASN'T me,) accidentally added a zero to the baking time of a few potatoes in our nearly-dead microwave. Because of this accident, we learned that over-microwaved potatoes will catch fire... and that the resulting smell with fill the WHOLE house with an odor very similar to burning cigars.

We all decided that we desperately wanted to go grocery shopping. That evening. Immediately. I'm pretty sure Olympic speed records were set in the coat & shoe-donning categories.

The next morning I opened the microwave to clean things out, and discovered that more than a little of the odor was still lingering. I figured that a little vinegar & lemon juice would help clean things out, but the kids asked if we could try microwaving another bar of Ivory soap. I figured it sure couldn't hurt anything & it might make the smell a bit more liveable, so why not. Then they brought me BOTH bars and asked if we could nuke them both to see how much of the microwave it would fill.

For those of you who know about our popcorn experiment, or our setting the tent up in the living room in February this probably won't surprise you at all, but the little voice in my head immediately started shouting "DO IT! You know you want to!!!" And... yeah, I listened.

The answer is - two bars of soap fill a microwave to about 3/4 full - UNTIL you open the door & let out the warm air. Immediately upon opening the door, the soap pile deflates quite a bit, and this is what you're left with.
It's pretty cool, because what looks like a pile of foam is actually a dry squidgy foamy texture that's fun to play with. For anyone recreating this, it also sheds powdery soap "dust" EVERYWHERE so make sure you're ready to clean soap up from wherever you choose to play with this.

Once we'd had our fun, we needed to find something we could do with the soap since we don't believe in wasting. First we picked it up to crumble into the blender... and discovered something rather amusing that none of us remember seeing from the last time we did this.

Do you see it? Yeah, we all thought that was VERY cool! I think our next Ivory soap experiment will be to try two bars at once again, with one face-up & one face-down to try and figure out why this happened.

Once run through the blender, we discovered that two bars of soap makes NEARLY a quart of soap "snow." The kids then tried to add food coloring to it, and found out that you just can't color dry soap flakes - the color balls up & won't incorporate through shaking.


I thought we would be leaving the soap in this form & using it as a dry soap, but the kids had another idea. After a few minutes search online, we found a recipe for liquid soap and boiled a gallon of water on the stove. Once the water had boiled, we slowly stirred the soap flakes in, (it was at this point I found out exactly HOW MUCH food coloring the kids had tried to add!) and then transferred the whole lot to our stand mixer.

It took about four hours for the soap to finish setting, but what we ended up with was nearly a full gallon of bright blue cherry-cola scented (we added some of the oils from my apothecary; back before I decided to exclusively essential oils) soft soap. We poured as much as we could into a bottle saved from one purchase or another, and the rest into an old juice pitcher.
This soap does NOT foam up well, but it sure smells nice! And we have enough liquid soap for several MONTHS now... all thanks to a "happy little accident."


Monday, December 31, 2012

New Year's Eve

My parents & I have had a tradition since before we were married, of staying up late and playing cards until 2-3 in the morning on New Years Eve. Three years ago, they informed me that they were feeling "too old" to stay up that late anymore, and asked if we minded coming over on New Years Day instead.

Mind? Of course not. But... what to do then, on New Years Eve?!?

That year, we purchased the Wii as a family gift. So we stayed up until 5am competing against each other at bowling, golfing, and all sorts of other games. And the kids loved it so much, that we've continued that tradition every year since.

This will mark our 4th annual New Year's Eve Wii-petition. And with a few more games in our collection, this looks to be one heck of a challenge this year if we see if anyone can finally beat the boy at bowling, the princess at Balance Bubble, or Mama at Rhythm parade.
 In keeping with last years' New Years Eve decorations, I gave myself a $20 budget - and this year, barely spent HALF that since I already had so many goodies on hand. And this time it was my SON who helped choose how & where we would decorate! No clue why as it's usually us two girls prettying up the place, but this time my guy helped me. And I LOVE what we came up with!

We combined our lantern-decoration from last year with the clocks, and added just a few more clocks from the thrift store.

On the tray with the pocket watches, instead of the glass beads we chose to use vintage buttons this year - and I really think it added just a bit more "oomph" to things.

In our kitchen niche, we did almost exactly the same thing as last year... simply adding the new year to the back of last years' paper "2012" to get one more years' use out of the pretty shiny brown cardstock.
The biggest change this year, was actually ALL my son's idea. Inspired by THIS number display, he suggested we hunt for items at the thrift store and within our house to create a display of "Things with twos, zeros, ones and threes."

We found a couple board books for $1.91, and a partial game of dominoes for $.65 and decided to raid our own game cabinet for the rest of our display. And I have to say - I LOVE how this turned out! It's a bit more whimsical (and brightly colored!) than I had originally imagined recreating that display, but I love how nearly everything there was already in our house - and that it came from the imagination of my son.

Happy New Year everyone!!! How are YOU spending this evening?!? 

Wednesday, December 12, 2012

A Tiny Winter Garland

I have been trying to come up with a tiny garland for my fireplace, and not really liking anything I've seen. I wanted something wintry, but simple. Something I wouldn't get bored looking at all winter long. Last week, I placed an order for a few gifts for my preschoolers, and added a package of mini-clothespins because I'd been wanting them for a Valentine's Day craft. When they arrived, inspiration struck & I pulled out my crafting supplies.

 Isn't it pretty? Other than the new little clothespins, everything here is from my stash of crafting papers/goodies and I LOVE how it turned out!

The snowflakes were punched from glitter cardstock for subtle sparkle, and the buttons came straight from my button jars.
The letter stickers have been sitting unused in the bottom of my sticker drawer for nearly a decade, and the red papers are actually paper scraps from my scrap-baggie!


To share just one more winter photo... with my latest living-room rearrangement I lost the LONG stretch of bookshelves against one wall. Now I have a MUCH smaller space above the cupboards, but I still wanted to do something festive to brighten things up.

After a few attempts, I'm happy with the space now. And all it took was putting my thrifted candy dish up there with a few glass ornaments!

Don't you just love it when projects just "fall into place" like this?


Friday, December 7, 2012

Winter Decorations

Wow, is it this time already?

Our house is all ready for Christmas in our winter-long decorations, and I can't wait to share. Several of our decorations have remained the same from last year, but there are some definite changes. The first meets you right at the door.


Since moving the sewing machine to our entry space, I had to find something to go on the wall above it. I loved the way my HUGE grapevine wreath filled the space, so I just took the fall decoration out of the center, and added some pinecones & snowflake ornaments. I LOVE how this looks!
Then on top of the machine are my "white Christmas" elements.

My tree & fireplace decorations haven't changed from last year. NEXT year our tree will be going through a makeover, but for this year we stayed with our snowmen, snowflakes & glass icicles for a happy wintry feel. My daughter still loves rearranging the scene underneath the tree, and I am still loving how much easier it is to maneuver around the living room without an enormous tree constantly in our way. 


In the living room windows, I keep my antique mason jars and the giant pinecones from my sisters' yard. It's hard to photograph this space because of lighting issues, but you can see how we added some holly garland & poinsettias for a bit of a festive flair.

In the kitchen, because I need every spare inch of space for everyday baking, I keep things to a minimum. The niche above my cabinets and the windowsill are the only places ever decorated. My window was inspired by a photo on Pinterest, and I even made a new curtain this year - from a scrap of fabric I've been saving.


In the dining room, most of my decorations have remained the same; the nativity is still in the same place, and many of the decorations on my little hutch are from years past - though some have moved from one place to another over the years. 


Two new goodies for this year are my little car, and the cardinals. In years past, these cardinals have been in the living room. This year I thought I'd give them a new home, in a stack of birch from my parents' yard. And my little Volkswagen car usually sits on the bookshelf in my room, but this year it came out as a seasonal decoration, with a tiny sisal tree tied to the top!


For the table, I placed a vintage embroidered tablerunner over my favorite crocheted tablecloth, and added the cutest little thrifted sled as a centerpiece. My chandelier is the same as last year, with green garland, poinsettias, and spare snowflake ornaments from the tree.


In my bedroom I set up my little feather tree, but unlike years past I put it on top of my Amelia Earhart suitcases instead of the tiny electric fireplace. I love the way this turned out! And of course I had to repeat the little toy car element.


My kids are free to decorate their rooms their own way, and I usually have very little to do with this. Being a teen, my son is rather ambivalent and has yet to put up his retro tinsel tree quite yet.

My daughter on the other hand has been waiting for her friends to come over, to make a party of decorating her room. Most of the decorations will likely stay the same as previous years, but at her request we did make a few new goodies for her space. This year she has a new tulle wreath, and a little snowgirl (complete with hand-crocheted hat & scarf!) made from a giant jingle-bell that really help set the tone for her pastel bedroom.


What do you have in YOUR house?!?

Thursday, October 25, 2012

Autumn Decorations

Oh wow, has this been a busy few months! Here I am nearly into November, and I haven't shared our Autumn decorations yet!

Fall is my favorite season, and I LOVE decorating for it! If I were to overrun my "one bin per season" rule, it would be for right now. There's something so wonderful about the not-too-hot, not-too-cold weather, with the bright colors, bonfires, crispy crunchy walking paths, and clear skies. And our house takes on a wonderful, warm look for the season too!

Our front door, fireplace, kitchen cabinet-niche, chandelier & the space above our bookshelves have all stayed the same from year to year. We DID have some fun rearranging things and picking up just a few new decorations however.

On the accent table, we used my pretty carved wooden basket, along with the pheasant feathers and our favorite little scarecrow.


The sewing table has moved right next to our front door, making it a perfect place to display a few of our favorite things. On the top, we created a back-to-school display showcasing our McGuffy reader and a few other favorite goodies that make us think of school.


Above the sewing table is the biggest grapevine wreath I've ever made, with the Victorian cone I made from last year tucked inside. 


On the hutch, most of our decorations have stayed the same, we've just rearranged things. One piece I did pick up was an amber glass pumpkin cookie jar. For as long as I can remember, my mom has had a clear one just like this, and I have always wished it was orange. When I saw this sitting at the thrift store for less than $2 I HAD to pick it up and bring it home.


And the one decoration that changes every year is our "spooky author" display. Each year we choose an author to learn about, and then create a display that showcases something about them or their books. This year we chose Lemony Snickett, and decided to choose items from each of the books for our display.
If you've read the books, you should be able to recognize everything here as a key element to one of the 13 books from the Series of Unfortunate Events. I think my favorite element however, is the photo of the VFD eye-tattoo. We took a permanent marker and gave my son a "tattoo," then printed a photo of it with the colors washed out. I love how it turned out, and my daughter thinks it's hysterical that her big brother's ankle was a stand-in for Count Olaf in our display.


Happy Autumn everyone! What have you done to decorate your space?!?


Monday, August 27, 2012

Our Back to School Lunch

After what was possibly the most odd/frustrating/unnerving summers ever, we started back to school today.

One of my favorite parts of homeschooling is being able to declare any day I wish a class-party day. And the first day of school always seems to be worthy of a tiny celebration, even if we've only taken two weeks off!

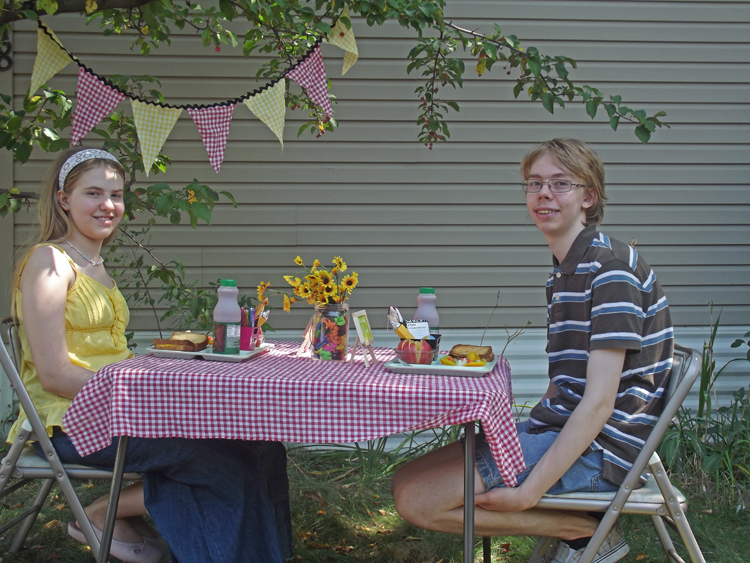
In our front yard is a beautiful flowering crabapple tree. The kids named it "The Treat Tree" while in kindergarten because while inedible to us, the bird & squirrels seem to think that the tiny crabapples are a wonderful treat. But once a year on the first day of school, I turn the tree into the backdrop for a special treat for my kids.

From its branches I hung a tiny banner made from gingham & ricrack. Then underneath the tree, I set out our little card table with a matching gingham tablecloth. For a centerpiece, I took alphabet fridge magnets & tucked them into a mason jar full of sunflowers.

Lunch this year was grilled cheese sandwiches, mixed veggies, caramel-covered apple slices, (I use fat-free ice cream topping... it pours so well, is great for double-dipping, AND lower in fat & calories!!!) and an extra special bottle of chocolate milk. I surprised the kids this year with thrifted vintage school lunch-trays. They LOVED them and were absolutely ecstatic to learn that they were dishwasher safe so we can use them every day!


For a tiny surprise, each of the kids received a tiny metal pail with some colorful pens, an itty-bitty pocket notebook, a cute globe-shaped pencil sharpener and a few candies put together to resemble giant pencils. I got the idea for the pencils HERE and they were so easy to put together!

Usually we eat lunch inside without any kind of ceremony but the kids really seem to like our first-day picnic. For the past month I've been being asked "We ARE gonna have a special lunch this year, RIGHT?!?" I had considered skipping it this year since both kids are in high-school and I didn't want to embarrass them, but after being asked several times by BOTH kids - well, I just couldn't NOT plan something special.

This is one tradition I'm glad we've kept up.